Tuesday, May 24, 2011

Scope Creep...A new water line

It all started with the old water line sticking out too far into the wall space an not wanting to have to box around all of the fittings with the drywall. I should probably move all that stuff so that it resides in the stud bay of the wall. While I am at it, I should just replace the water line since it is probably 50-100 years old and I know 2 other people in Ballard who's iron lines have failed catastrophically in the past few years.
The finished new line connection with a new pressure regulator and drain valve.

Here is what lives in an old iron water pipe...doesn't look too good does it?

The 22' long and 2' deep trench took about 2 hours to dig and 1/2 hour to backfill.

22' of 3/4" copper is now $104 these days. Poly line is now generally used for this and it would have cost $5, but it failed the smell test (it stuck like chemicals and I did not want to drink out of it). It is really hard to tighten 3/4" NPT fitting in the bottom of a 30" deep hole.

Old rusty iron line on right and new copper line on left.

My nemesis flare fitting supplied by the city for connection to the meter. It took 4 tries to get this thing to seal.

Trench and hole drilled in foundation. Original line was 12"-18" deep and new code is 24".

Friday, May 20, 2011

Framing Update

Have finally come to terms with fastening wall plates to the concrete with Tapcons...they need to only be screwed into the concrete 3/4" in or they lock up and snap off or strip.
Shimming and anchoring plates to footing to hide in wall.


Wednesday, May 18, 2011

Sewer and Plumbing

Shower is installed (fastened and drain connected). It was not much fun to move it in and out 3 times to position the trap assembly in the exact location for gluing.
Washer and pump drain and vent lines. I wish I would have done this myself since it was hard to get the plumber to do what I wanted and I still had to rework some things.Pump outlet to sewer has cleanout behind toilet.
Backfilled...I forgot to get a picture of the big dirt pile.
6" clay sewer line. Plumber's helper had to live down in the bottom of the 4' trench for a while. This took them about 4 hours to complete and were handsomely rewarded.
New PVC Y fitting to 3" ABS line to house.

Posted by Picasa

Wednesday, May 11, 2011

Floor Concrete

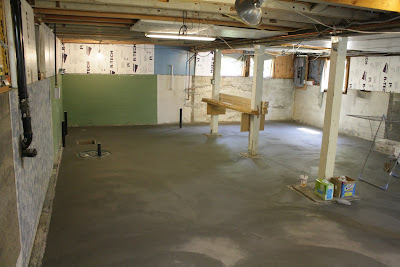
Finally the concrete day has arrived. 11 yards (~36,000 pounds) of concrete were ordered in 2 trucks (a truck only holds 10). Had to pump the concrete in due to our weak and small driveway. It took about 2 hours to get the mud in and pack up the pump.


Posted by Picasa

Friday, May 06, 2011

Gas line...and a long lost leak

I had to redo the gas line inside the house to tuck it under the joists and to add a new feed to the dryer location in the new bathroom. It ended up not being to bad considering that there was only one union at the meter that I could disconnect. I was able to make some room with the sawsall and drop the entire assembly to make room to disconnect at the elbows. I added 2 unions to make it easier to add anything.

Dryer outlet box.
So I turned on the gas and check for leaks. After smelling gas near the meter, I checked all my fittings with soap and found that there was a very slow leak at the gas company connection to the meter. I think it may have been leaking for years like this or it started when it was disturbed when I was digging the sewer line.
Posted by Picasa

Tubing and post anchoring

Radient tubing is attached to the wire grid with zip ties (>500 were used). This is larger tubing than most people use (7/8"), but provides more BTU/ft than most other and has less pump loss. It is a bear to wrestle with though when tying it down. I did 2 folded reverse spirals and this requires that you know where you are going to end and is a bit tedious with the pier obstructions and the pump basin in the way.
Tubing connections with valves, temperature probes, and manifold.
Center beam posts are now anchored to the footings so they cannot shake off (common earthquake retrofit task).
Plates on the top also keep them from vibrating out under strong shaking.
Posted by Picasa

Sunday, May 01, 2011

Foam and plumbing

Starting to lay the foam after finally getting all the dirt out of here for leveling.
Drains are roughed in and pump basin is set.

Posted by Picasa

Saturday, April 23, 2011

Replacement footing

One of the footings needed to be replaced since when the floor was removed, the post was not even touching the pad. It turns out that the footing blocks were sitting on big rocks placed in the dirt. This did not work so well with our soft sandy soil.

A lot of dirt was moved to level out the floor. With my new laser level, I figured that the house is out of level about 1" front to back and the floor was sloped more than 3". I had to take out about 1.5" of dirt from about 1/2 the floor area. I think this ended up being about 1-2 yards of dirt and had to go out the window in buckets.
Dug the hole for the basin (more dirt to remove!).
Rolled out some large bolders and the useless footing up the ramp (they were not liftable so I would guess >150 pounds each).
Bolder alley...one of these was under the concrete footing...they did end up using rock footings under the concrete footings.
Posted by Picasa